Prerequisites
Essential tools and configurations for your development environment
Install Foundational Tools
Package managers and core development tools needed to install everything else
Select packages to install:
Customize Your Setup!
You can uncheck any items you don't need. The install command below will automatically update to include only your selected tools.
Tip: Required items cannot be unchecked
Tip: Uncheck items you don't need to customize your setup!
Provides essential compilers (gcc, clang) and development headers that Homebrew and other tools need to build software
The missing package manager for macOS
Reproducible builds and development environments
Automatic environment variable loading
Better terminal emulator
AI assistant for coding
Web browser
Local AWS cloud stack for development and testing
Text editor
Download files from the web
Display directory structure
Interactive process viewer
JSON processor
Fast file search
Fuzzy finder
GitHub from the command line
Kubernetes CLI to manage clusters in style
Kubernetes command-line tool
Amazon Web Services command-line interface
Configure direnv
Set up direnv to automatically load environment variables when entering directories
Enable direnv in your shell
# Add direnv hook to .zshrc
echo 'eval "$(direnv hook zsh)"' >> ~/.zshrc
Configure direnv settings
# Create direnv config directory
mkdir -p ~/.config/direnv

# Create direnv configuration file
cat > ~/.config/direnv/direnv.toml << 'EOF'
[global]
# don't display large env diff on cd
hide_env_diff = true

[whitelist]
# don't require direnv allow on whitelisted dir
prefix = [ "~/projects/" ]
EOF
IDE Extensions for direnv
IDE extensions automatically load environment variables from .envrc files when you open a project, ensuring your development environment matches the project configuration without manual setup.
- 1.Open VS Code Extensions (⌘ + Shift + X)
- 2.Search for 'direnv'
- 3.Install 'direnv' extension by mkhl (mkhl.direnv)
- 4.The extension will automatically detect .envrc files
- 5.You'll see environment variables load when entering project directories
Configure Shell Environment
Set up your .zshrc with useful aliases and configurations
Install Oh My Zsh framework
# Install Oh My Zsh (interactive installer)
sh -c "$(curl -fsSL https://raw.githubusercontent.com/ohmyzsh/ohmyzsh/master/tools/install.sh)"
Install Powerlevel10k theme and fonts
# Install Powerlevel10k theme
git clone --depth=1 https://github.com/romkatv/powerlevel10k.git ${ZSH_CUSTOM:-$HOME/.oh-my-zsh/custom}/themes/powerlevel10k

# Install recommended font (optional but recommended)
brew tap homebrew/cask-fonts
brew install --cask font-meslo-lg-nerd-font
Install essential Zsh plugins
# Install zsh-autosuggestions
git clone https://github.com/zsh-users/zsh-autosuggestions ${ZSH_CUSTOM:-~/.oh-my-zsh/custom}/plugins/zsh-autosuggestions

# Install zsh-syntax-highlighting
git clone https://github.com/zsh-users/zsh-syntax-highlighting.git ${ZSH_CUSTOM:-~/.oh-my-zsh/custom}/plugins/zsh-syntax-highlighting

# Install z (directory jumper)
brew install z
Backup existing .zshrc file
cp ~/.zshrc ~/.zshrc.backupCopy this configuration to ~/.zshrc
# ~/.zshrc
# Enable Powerlevel10k instant prompt. Should stay close to the top of ~/.zshrc.
# Initialization code that may require console input (password prompts, [y/n]
# confirmations, etc.) must go above this block; everything else may go below.
if [[ -r "${XDG_CACHE_HOME:-$HOME/.cache}/p10k-instant-prompt-${(%):-%n}.zsh" ]]; then
  source "${XDG_CACHE_HOME:-$HOME/.cache}/p10k-instant-prompt-${(%):-%n}.zsh"
fi

# Suppress Powerlevel10k instant prompt warning for direnv output
# This prevents the warning about console output during initialization
typeset -g POWERLEVEL9K_INSTANT_PROMPT=quiet

# Path configuration
export PATH=$HOME/bin:/usr/local/bin:$PATH
export PATH="/opt/homebrew/opt/libpq/bin:$PATH"
export PATH=$PATH:/Applications/Postgres.app/Contents/Versions/15/bin
export PATH="/opt/homebrew/opt/openssl@3/bin:$PATH"

# Oh My Zsh configuration
export ZSH="$HOME/.oh-my-zsh"

# Use Powerlevel10k theme for better prompts
ZSH_THEME="powerlevel10k/powerlevel10k"

# Productive plugins
plugins=(
    git                    # Git aliases and functions
    z                      # Jump to frequently used directories
    zsh-autosuggestions    # Fish-like autosuggestions
    zsh-syntax-highlighting # Fish-like syntax highlighting
    direnv                 # Auto-load .envrc files
    docker                 # Docker completions
    docker-compose         # Docker compose completions
    kubectl                # Kubernetes completions
    aws                    # AWS CLI completions
    terraform              # Terraform completions
    npm                    # NPM completions
    python                 # Python completions
    pip                    # Pip completions
    history                # Better history search
    colored-man-pages      # Colorized man pages
    command-not-found      # Suggest package to install
    extract                # Extract any archive with 'x'
)

# Performance optimizations
DISABLE_UNTRACKED_FILES_DIRTY="true"  # Faster git status in large repos
COMPLETION_WAITING_DOTS="true"         # Show dots while waiting for completion
HIST_STAMPS="yyyy-mm-dd"              # Better history timestamps

source $ZSH/oh-my-zsh.sh

# Better history configuration
HISTSIZE=50000
SAVEHIST=50000
setopt EXTENDED_HISTORY          # Write the history file in the ":start:elapsed;command" format
setopt INC_APPEND_HISTORY        # Write to the history file immediately, not when the shell exits
setopt SHARE_HISTORY             # Share history between all sessions
setopt HIST_EXPIRE_DUPS_FIRST    # Expire duplicate entries first when trimming history
setopt HIST_IGNORE_DUPS          # Don't record an entry that was just recorded again
setopt HIST_IGNORE_ALL_DUPS      # Delete old recorded entry if new entry is a duplicate
setopt HIST_FIND_NO_DUPS         # Do not display a line previously found
setopt HIST_IGNORE_SPACE         # Don't record an entry starting with a space
setopt HIST_SAVE_NO_DUPS         # Don't write duplicate entries in the history file
setopt HIST_REDUCE_BLANKS        # Remove superfluous blanks before recording entry

# Better directory navigation
setopt AUTO_CD              # Go to folder without typing cd
setopt AUTO_PUSHD           # Push the current directory on the stack
setopt PUSHD_IGNORE_DUPS    # Don't push multiple copies of the same directory
setopt PUSHD_MINUS          # Exchange meanings of + and -

# Aliases - Git (extending the git plugin)
alias gs='git status -sb'
alias gp='git pull --rebase'
alias gpu='git push'
alias gco='git checkout'
alias gcb='git checkout -b'
alias glog='git log --oneline --graph --decorate -10'
alias gdiff='git diff --stat'
alias gstash='git stash push -m'
alias gunstash='git stash pop'

# Aliases - Canary development
alias croot='cd ~/projects/canary'
alias cback='cd ~/projects/canary/backend'
alias ccan='cd ~/projects/canary/backend/canary'
alias cpms='cd ~/projects/canary/backend/pms-gateway'
alias cfront='cd ~/projects/canary/frontend'
alias cshared='cd ~/projects/canary/backend/shared'

# Aliases - Python/Django
alias pm='direnv exec . python manage.py'
alias pms='direnv exec . python manage.py shell_plus'
alias pmm='direnv exec . python manage.py migrate'
alias pmmm='direnv exec . python manage.py makemigrations'
alias pytest='direnv exec . python -m pytest'

# Productivity aliases
alias ll='ls -alFh'
alias la='ls -A'
alias l='ls -CF'
alias ..='cd ..'
alias ...='cd ../..'
alias ....='cd ../../..'
alias mkdir='mkdir -pv'
alias grep='grep --color=auto'
alias top='htop'

# Quick edit configs
alias zshrc='${EDITOR:-nano} ~/.zshrc && source ~/.zshrc'
alias vimrc='${EDITOR:-nano} ~/.vimrc'
alias gitconfig='${EDITOR:-nano} ~/.gitconfig'

# direnv configuration
export DIRENV_LOG_FORMAT=""
eval "$(direnv hook zsh)"

# Canary CLI function
canary () {
    nix run "git+ssh://git@github.com/canary-technologies-corp/canary-cli" -- "$@"
}

# Quick directory jump function for Canary monorepo
c() {
    case "$1" in
        root) cd ~/projects/canary ;;
        back|backend) cd ~/projects/canary/backend/canary ;;
        pms) cd ~/projects/canary/backend/pms-gateway ;;
        front|frontend) cd ~/projects/canary/frontend ;;
        shared) cd ~/projects/canary/backend/shared ;;
        scripts) cd ~/projects/canary/scripts ;;
        docs) cd ~/projects/canary/docs ;;
        tf|terraform) cd ~/projects/canary/terraform ;;
        *) echo "Unknown location: $1" ;;
    esac
}

# Function to quickly search code in the monorepo
search() {
    if [[ -z "$1" ]]; then
        echo "Usage: search <pattern>"
        return 1
    fi
    rg --smart-case --hidden --glob '!.git' --glob '!node_modules' --glob '!.venv' --glob '!__pycache__' "$@"
}

# FZF integration for better file/history search
[ -f ~/.fzf.zsh ] && source ~/.fzf.zsh

# Set default editor
export EDITOR='nano'
export VISUAL='nano'

# Canary directory
export CANARY_DIR="$HOME/projects/canary"

# Load Powerlevel10k configuration if it exists
[[ ! -f ~/.p10k.zsh ]] || source ~/.p10k.zsh
Reload shell configuration
source ~/.zshrcConfigure Terminal for Powerlevel10k
Set up your terminal to use the recommended font for the best experience
- Open iTerm2 Preferences (⌘ + ,)
- Go to Profiles → Text
- Change Font to 'MesloLGS NF'
- Restart your terminal
- Run 'p10k configure' to set up your prompt style
- Note: The zshrc config includes 'POWERLEVEL9K_INSTANT_PROMPT=quiet' to suppress warnings about direnv output during shell initialization
Set up Canary
Clone repositories and configure the Canary development environment
Why No Make Commands?
This guide intentionally avoids using make commands and instead shows the underlying Docker and shell commands. This helps you understand exactly how your local environment works, making debugging easier and giving you more control over each step.
Configure Git
Set up Git with your user information and credentials
Configure Git settings
# Configure Git user information
git config --global user.name "Your Name"
git config --global user.email "your.email@canarytechnologies.com"

# Enable credential caching
git config --global credential.helper osxkeychain

# Automatically set up remote tracking branches
git config --global push.autoSetupRemote true
Generate SSH key (press Enter for no passphrase)
ssh-keygen -t ed25519 -C "your.email@canarytechnologies.com" -f ~/.ssh/id_ed25519Add SSH key to ssh-agent
ssh-add ~/.ssh/id_ed25519Copy SSH public key to clipboard
pbcopy < ~/.ssh/id_ed25519.pubTest SSH connection (should see "Hi [username]! You've successfully authenticated...")
ssh -T git@github.comSSH Key Setup
Choose whether to generate a new SSH key or migrate an existing one from another machine
Generate and Configure SSH Key
- 1.Run the SSH key generation commands above in order
- 2.When prompted for a passphrase, press Enter (no passphrase)
- 3.Your public key is now in your clipboard
Add Key to GitHub
- 1.Go to https://github.com/settings/ssh/new
- 2.Title: "Work MacBook - [Your Name]"
- 3.Paste the key and click 'Add SSH key'
Verify Connection
- 1.Test your connection: ssh -T git@github.com
- 2.You should see: "Hi [username]! You've successfully authenticated..."
Clone Canary Repositories
Clone the main Canary repositories to get started with development
Select repositories to clone:
Canary Monorepo
The main Canary application codebase
git@github.com:canary-technologies-corp/canary.gitCanary Terraform
Infrastructure as Code for Canary deployments
git@github.com:canary-technologies-corp/canary-terraform.gitConfigure Environment Variables
Set up environment variables for Canary development
Create .env Configuration
Set up environment variables for your project. Choose the appropriate configuration based on which service you're working with.
Navigate to Canary Backend
cd ~/projects/canary/backend/canaryCreate .env File
cat > .env << 'EOF'
# Canary Backend Environment Variables

# Database Configuration
DATABASE_USER="postgres"
DATABASE_PASSWORD="postgres"
DATABASE_HOST="localhost"
DATABASE_PORT="5432"
CRS_GATEWAY_DATABASE_NAME="crs_gateway"

# Redis Configuration
# We use one shared Redis instance with different databases (0-4)
# instead of separate Redis instances as in the official guide
REDIS_CACHE_URL="redis://localhost:6379/0"
CELERY_BROKER_URL="redis://localhost:6379/1"
CELERY_RESULT_BACKEND="redis://localhost:6379/2"
CHANNEL_LAYERS_REDIS_URL="redis://localhost:6379/3"
REDIS_LOCKING_URL="redis://localhost:6379/4"

# Logging Configuration
COMPACT_LOGGING=true
COMPACT_LOG_MAX_URL_LENGTH=120
COMPACT_LOGGING_COMPACT_UUIDS=true
EOF
Reload Environment
direnv reloadConfigure AWS Access
Set up AWS credentials and verify access to Canary services
Configure AWS access and verify credentials
# Navigate to Canary directory
cd ~/projects/canary

# Set up local AWS access
canary aws local-access-setup

# Verify AWS access is working
canary aws app-login
Configure Docker Services
Set up docker-compose override for shared PostgreSQL and Redis services
Shared Services Configuration
The official Canary setup uses separate PostgreSQL and Redis instances for each service. For local development, we simplify this by using single shared instances for both Canary and PMS Gateway:
- One PostgreSQL instance on port 5432 (instead of separate instances on 5432 and 5433)
- One Redis instance on port 6379 (instead of separate instances on 6379 and 6380)
This override file ensures all services use the standard ports, making local development simpler.
Download Required Files
Docker Compose Override
Override file to run PostgreSQL on port 5432 and Redis on port 6379
docker-compose.override.yml
⚠️ Place this file in ~/projects/canary/backend/canary/ after downloading
Place the override file in the correct location
# After downloading, place the override file in the Canary backend directory
cp ~/Downloads/docker-compose.override.yml ~/projects/canary/backend/canary/

# Verify the file is in place
cat ~/projects/canary/backend/canary/docker-compose.override.yml

# This override file configures:
# - PostgreSQL: port 5433 → 5432 (standard port)
# - Redis: port 6380 → 6379 (standard port)
Set up Redis
Configure Redis for caching and session management
Start Redis container and verify it's running
# Navigate to Canary backend directory
cd ~/projects/canary/backend/canary

# Start Redis service (will use port 6379 from override file)
docker compose up --wait redis

# Verify Redis is running
docker compose exec redis redis-cli ping
# Should output: PONG
Test Redis connection from Python environment
# Test Redis connection from Python
cd ~/projects/canary/backend/canary
source .venv/bin/activate
python -c "import redis; r = redis.Redis(host='localhost', port=6379, db=0); print('Redis connected:', r.ping())"
# Should output: Redis connected: True
Set up Database
Configure PostgreSQL and import database dumps to quickly set up your local database without running migrations from scratch
PostgreSQL Configuration
The docker-compose.override.yml file (configured in the previous step) ensures PostgreSQL runs on the standard port 5432. All databases use postgres/postgres as the username and password.
Start Database
Start PostgreSQL service with the correct configuration
Start PostgreSQL container and create empty databases
# Navigate to Canary backend directory
cd ~/projects/canary/backend/canary

# Start PostgreSQL service (will use port 5432 from override file)
docker compose up --wait postgres

# Set postgres user password
docker compose exec postgres psql -U postgres -c "ALTER USER postgres PASSWORD 'postgres';"

# Create databases
docker compose exec postgres psql -U postgres -c "CREATE DATABASE canary;"
docker compose exec postgres psql -U postgres -c "GRANT ALL PRIVILEGES ON DATABASE canary TO postgres;"

docker compose exec postgres psql -U postgres -c "CREATE DATABASE event;"
docker compose exec postgres psql -U postgres -c "GRANT ALL PRIVILEGES ON DATABASE event TO postgres;"

docker compose exec postgres psql -U postgres -c "CREATE DATABASE vector;"
docker compose exec postgres psql -U postgres -c "GRANT ALL PRIVILEGES ON DATABASE vector TO postgres;"

docker compose exec postgres psql -U postgres -c "CREATE DATABASE crs_gateway;"
docker compose exec postgres psql -U postgres -c "GRANT ALL PRIVILEGES ON DATABASE crs_gateway TO postgres;"

docker compose exec postgres psql -U postgres -c "CREATE DATABASE pms_gateway;"
docker compose exec postgres psql -U postgres -c "GRANT ALL PRIVILEGES ON DATABASE pms_gateway TO postgres;"

# Enable vector extension on vector and canary databases
docker compose exec postgres psql -U postgres -d vector -c "CREATE EXTENSION IF NOT EXISTS vector;"
docker compose exec postgres psql -U postgres -d canary -c "CREATE EXTENSION IF NOT EXISTS vector;"
Download Database Dumps
Download the database dump files for all services
Canary Database
Main Canary application database
canary_db_dump_20250701_221949.sql
Event Database
Canary event tracking database
event_db_dump_20250701_222033.sql
Vector Database
Vector embeddings database
vector_db_dump_20250701_222134.sql
CRS Gateway Database
CRS Gateway database
crs_gateway_db_dump_20250701_222045.sql
PMS Gateway Database
PMS Gateway database
pms_gateway_db_dump_20250701_222647.sql
Import Database Dumps
Import the downloaded database dumps into PostgreSQL
Import all database dumps using Docker
# Import all database dumps (from Downloads folder)
cd ~/projects/canary/backend/canary

# Import Canary databases
docker compose exec -T postgres psql -U postgres canary < ~/Downloads/canary_db_dump_20250701_221949.sql
docker compose exec -T postgres psql -U postgres event < ~/Downloads/event_db_dump_20250701_222033.sql
docker compose exec -T postgres psql -U postgres vector < ~/Downloads/vector_db_dump_20250701_222134.sql

# Import gateway databases
docker compose exec -T postgres psql -U postgres crs_gateway < ~/Downloads/crs_gateway_db_dump_20250701_222045.sql
docker compose exec -T postgres psql -U postgres pms_gateway < ~/Downloads/pms_gateway_db_dump_20250701_222647.sql
Verify Database Import
Verify that all databases were imported successfully
Verify that all databases were imported successfully
# Verify all database imports
cd ~/projects/canary/backend/canary

# List all databases
docker compose exec postgres psql -U postgres -c "\l" | grep -E "(canary|event|vector|crs_gateway|pms_gateway)"

# Check table counts for each database
docker compose exec postgres psql -U postgres -d canary -c "SELECT COUNT(*) as table_count FROM information_schema.tables WHERE table_schema = 'public';"
docker compose exec postgres psql -U postgres -d event -c "SELECT COUNT(*) as table_count FROM information_schema.tables WHERE table_schema = 'public';"
docker compose exec postgres psql -U postgres -d vector -c "SELECT COUNT(*) as table_count FROM information_schema.tables WHERE table_schema = 'public';"
docker compose exec postgres psql -U postgres -d crs_gateway -c "SELECT COUNT(*) as table_count FROM information_schema.tables WHERE table_schema = 'public';"
docker compose exec postgres psql -U postgres -d pms_gateway -c "SELECT COUNT(*) as table_count FROM information_schema.tables WHERE table_schema = 'public';"
Configure Postico 2
Set up Postico 2 for easy database browsing
Download the Postico Local Library to get pre-configured connections for all databases.
Postico Local Library
Complete Postico 2 configuration for all Canary databases
Postico_Local_Library.zip
To import:
- Unzip the downloaded file
- In Postico 2, go to Window → Show Library
- Right-click in the sidebar and choose "Import Folder..."
- Select the unzipped "Local Library" folder
- All 5 database connections will appear under "Canary Local Development"
Connections are pre-configured with localhost:5432 and postgres/postgres credentials.
Start from Scratch
Delete all databases and start fresh (use with caution)
Set up LocalStack
Configure LocalStack for local AWS service emulation
Start LocalStack and create required SQS queues
# Navigate to Canary backend directory
cd ~/projects/canary/backend/canary

# Start LocalStack service
docker compose up --wait localstack

# Create the delivery FIFO queue
docker compose exec localstack awslocal sqs create-queue --queue-name "delivery.fifo" --attributes "FifoQueue=true"

# Verify the queue was created
docker compose exec localstack awslocal sqs list-queues
Run Canary Backend
Install dependencies and start the Canary development server
Create symbolic links for libmagic and cairo libraries in /usr/local/lib (requires sudo password)
# Install native dependencies
cd ~/projects/canary/backend/canary
yes | bash ../../scripts/install_dyld.sh

# This script:
# - Finds libmagic and cairo libraries installed via Nix
# - Creates symbolic links in /usr/local/lib so Python can find them
# - Requires sudo password to write to /usr/local/lib
# - The 'yes' command auto-confirms overwriting existing links
Create a new Python virtual environment in .venv/ directory
# Create Python virtual environment
cd ~/projects/canary/backend/canary
uv venv --seed
Activate virtual environment and install all Python packages
# Activate virtual environment and install Python dependencies
cd ~/projects/canary/backend/canary
source .venv/bin/activate
uv pip sync requirements*.txt
Run Django migrations on all databases
# Run migrations for all Canary databases
cd ~/projects/canary/backend/canary
source .venv/bin/activate

# Run migrations in parallel
python manage.py migrate &
python manage.py migrate --database=event &
python manage.py migrate --database=vector &
python manage.py migrate --database=crs_gateway &
wait
Build shared frontend component library
# Build frontend components
cd ~/projects/canary/frontend-components
pnpm --version
pnpm i
pnpm build
Create cache table if not already present
# Create cache table (might already exist from dump)
cd ~/projects/canary/backend/canary
source .venv/bin/activate
python manage.py createcachetable || true
Create superuser with username 'root' and password 'root'
# Create Django superuser
cd ~/projects/canary/backend/canary
source .venv/bin/activate
echo "from django.contrib.auth import get_user_model; User = get_user_model(); User.objects.create_superuser('root', 'root@example.com', 'root') if not User.objects.filter(username='root').exists() else None" | python manage.py shell
Start the Canary backend server and visit /canary-admin
# Start Django development server
cd ~/projects/canary/backend/canary
source .venv/bin/activate
python manage.py runserver

# Server will start at http://localhost:8000
# Visit http://localhost:8000/canary-admin to access the Django admin
# Login with username: root, password: root
Run PMS Gateway
Install dependencies and start the PMS Gateway development server
Create a new Python virtual environment for PMS Gateway
# Create Python virtual environment for PMS Gateway
cd ~/projects/canary/backend/pms-gateway
uv venv --seed
Install all PMS Gateway Python packages
# Install PMS Gateway Python dependencies
cd ~/projects/canary/backend/pms-gateway
source .venv/bin/activate
uv pip sync requirements*.txt
Run Django migrations for PMS Gateway database
# Run PMS Gateway migrations
cd ~/projects/canary/backend/pms-gateway
source .venv/bin/activate
python manage.py migrate
Create cache table if not already present
# Create cache table for PMS Gateway (might already exist from dump)
cd ~/projects/canary/backend/pms-gateway
source .venv/bin/activate
python manage.py createcachetable || true
Create superuser with username 'root' and password 'root'
# Create Django superuser for PMS Gateway
cd ~/projects/canary/backend/pms-gateway
source .venv/bin/activate
echo "from django.contrib.auth import get_user_model; User = get_user_model(); User.objects.create_superuser('root', 'root@example.com', 'root') if not User.objects.filter(username='root').exists() else None" | python manage.py shell
Start the PMS Gateway server and visit /admin
# Start PMS Gateway development server
cd ~/projects/canary/backend/pms-gateway
source .venv/bin/activate
python manage.py runserver 0.0.0.0:8001

# Server will start at http://localhost:8001
# Visit http://localhost:8001/admin to access the Django admin
# Login with username: root, password: root
# Note: PMS Gateway runs on port 8001 (Canary uses 8000)
The Easy Way
Automate your development environment with smart tooling and scripts
Start Day Dot Py
Use a Python script to automatically set up your development environment in iTerm2 tabs
The steps above helped you understand what your development environment looks like. Now let's look at shortcuts, because running all these services manually every time you start working is tedious.
To run both Canary and PMS Gateway end-to-end, you need quite a few services running: PostgreSQL, Redis, both backend servers, and potentially frontend development servers. That's a lot of terminal windows to manage!
The official guide uses process-compose to manage all these services. To illustrate the complexity, here's what process-compose runs for a full Canary setup:
• PostgreSQL and Redis (via Docker)
• Django backend server (port 9090)
• Nginx reverse proxy
• Frontend development server (port 8080)
• Investigation agent service (port 8888)
• Fanout WebSocket server (port 9096)
• Frontend chat service
• Celery workers and Celery Beat scheduler
• Voice AI service (port 8082)
• Lock server (port 8083)
• LocalStack for AWS service emulation
• Inference/embedding service (port 9095)
• Various queue processors and consumers
• Python file watcher for hot reloading
...and more! That's over 20 processes running simultaneously.
That's a lot to manage! We prefer a simpler approach: run only the essential services we need, each in its own iTerm2 tab where logs are visible and services can be restarted independently.
We'll use a Python script that opens everything for us automatically. This script lives at ~/projects/canary/scripts/day/start.py and will be our go-to tool for starting our development environment.
The script uses the python-iterm2 package to interact with iTerm2 programmatically. This package is already included as a dev dependency in backend/canary, so you don't need to install anything extra. The script must be invoked from the canary backend directory like this: python3 ../../scripts/day/start.py
Here's the beautiful part: because of how this setup works, you'll rarely need to run this script. Once your iTerm2 tabs are set up, you'll only need to run it again when you restart your machine or want a completely fresh start. Individual services can be easily stopped (Ctrl+C) and restarted (up arrow + Enter) right in their tabs, so your day-to-day workflow is incredibly simple.
Configure iTerm2
Set up iTerm2 for the best development experience with our startup script
- Open iTerm2 Preferences (⌘ + ,)
- Go to General → Magic
- Check 'Enable Python API'
- When prompted about API access, select 'Allow all apps to connect'
- **Highly recommended:** Go to Appearance → General → Tab bar location and select 'Left'
- Restart iTerm2 if prompted
The Python API allows our script to create tabs automatically. Left-side tabs give you much more space to see service names and status at a glance.
Run the iTerm2 startup script
# Navigate to the canary backend directory and run the script
cd ~/projects/canary/backend/canary
python3 ../../scripts/day/start.py
Performance Optimizations
How our setup makes your development environment faster and more efficient
The startup script includes several performance optimizations compared to the default Django setup.
File System Events vs Polling
Django's default auto-reloader uses polling to check for file changes, which means checking every Python file every second. The script uses watchdog instead, which:
• Monitors file system events directly
• Uses less CPU (typically 50-70% reduction)
• Reloads faster when files change
Consolidated Services
Rather than running multiple database instances:
• Single PostgreSQL instance serves all databases (canary, pms_gateway, event, vector, crs_gateway)
• Single Redis instance with database separation (0-7 for Canary, 8-15 for PMS Gateway)
• Reduces memory usage by approximately 50%
Container Runtime
If using OrbStack instead of Docker Desktop:
• Faster container startup (2-3x)
• Lower resource overhead
• Native macOS virtualization framework
Skip Django System Checks
Django system checks slow down startup significantly.
• Added --skip-checks flag to development servers
• Reduces startup time by 30-50%
• System checks still run in production and CI
These optimizations are particularly noticeable when running multiple services or on machines with limited resources.
Nix and Direnv Magic
How Nix and direnv automatically manage your development environment
One of the most powerful aspects of this development setup is how Nix and direnv work together to manage your environment automatically. You might not even notice they're working, but they're doing a lot of heavy lifting behind the scenes.
Nix is a package manager that ensures everyone on the team has exactly the same versions of tools and dependencies. When you cd into the Canary directory, Nix automatically provides the right versions of Python, Node.js, PostgreSQL client tools, Redis tools, and dozens of other development utilities.
Direnv watches for .envrc files and automatically loads environment variables and activates virtual environments when you enter a directory. It also unloads them when you leave, keeping your shell clean.
Together, they mean:
• No 'works on my machine' problems – everyone has identical tool versions
• No manually activating Python virtual environments – direnv does it automatically
• No installing global packages that conflict between projects
• No forgetting to set environment variables – they're loaded automatically
• Clean separation between different projects' dependencies
When you see the Canary directory downloading and building things during initial setup, that's Nix creating a project-specific environment. When you see your shell prompt change as you cd between directories, that's direnv managing your environment. This invisible automation is what makes the development experience so smooth.
🎉Happy Coding!
Your development environment is now ready!
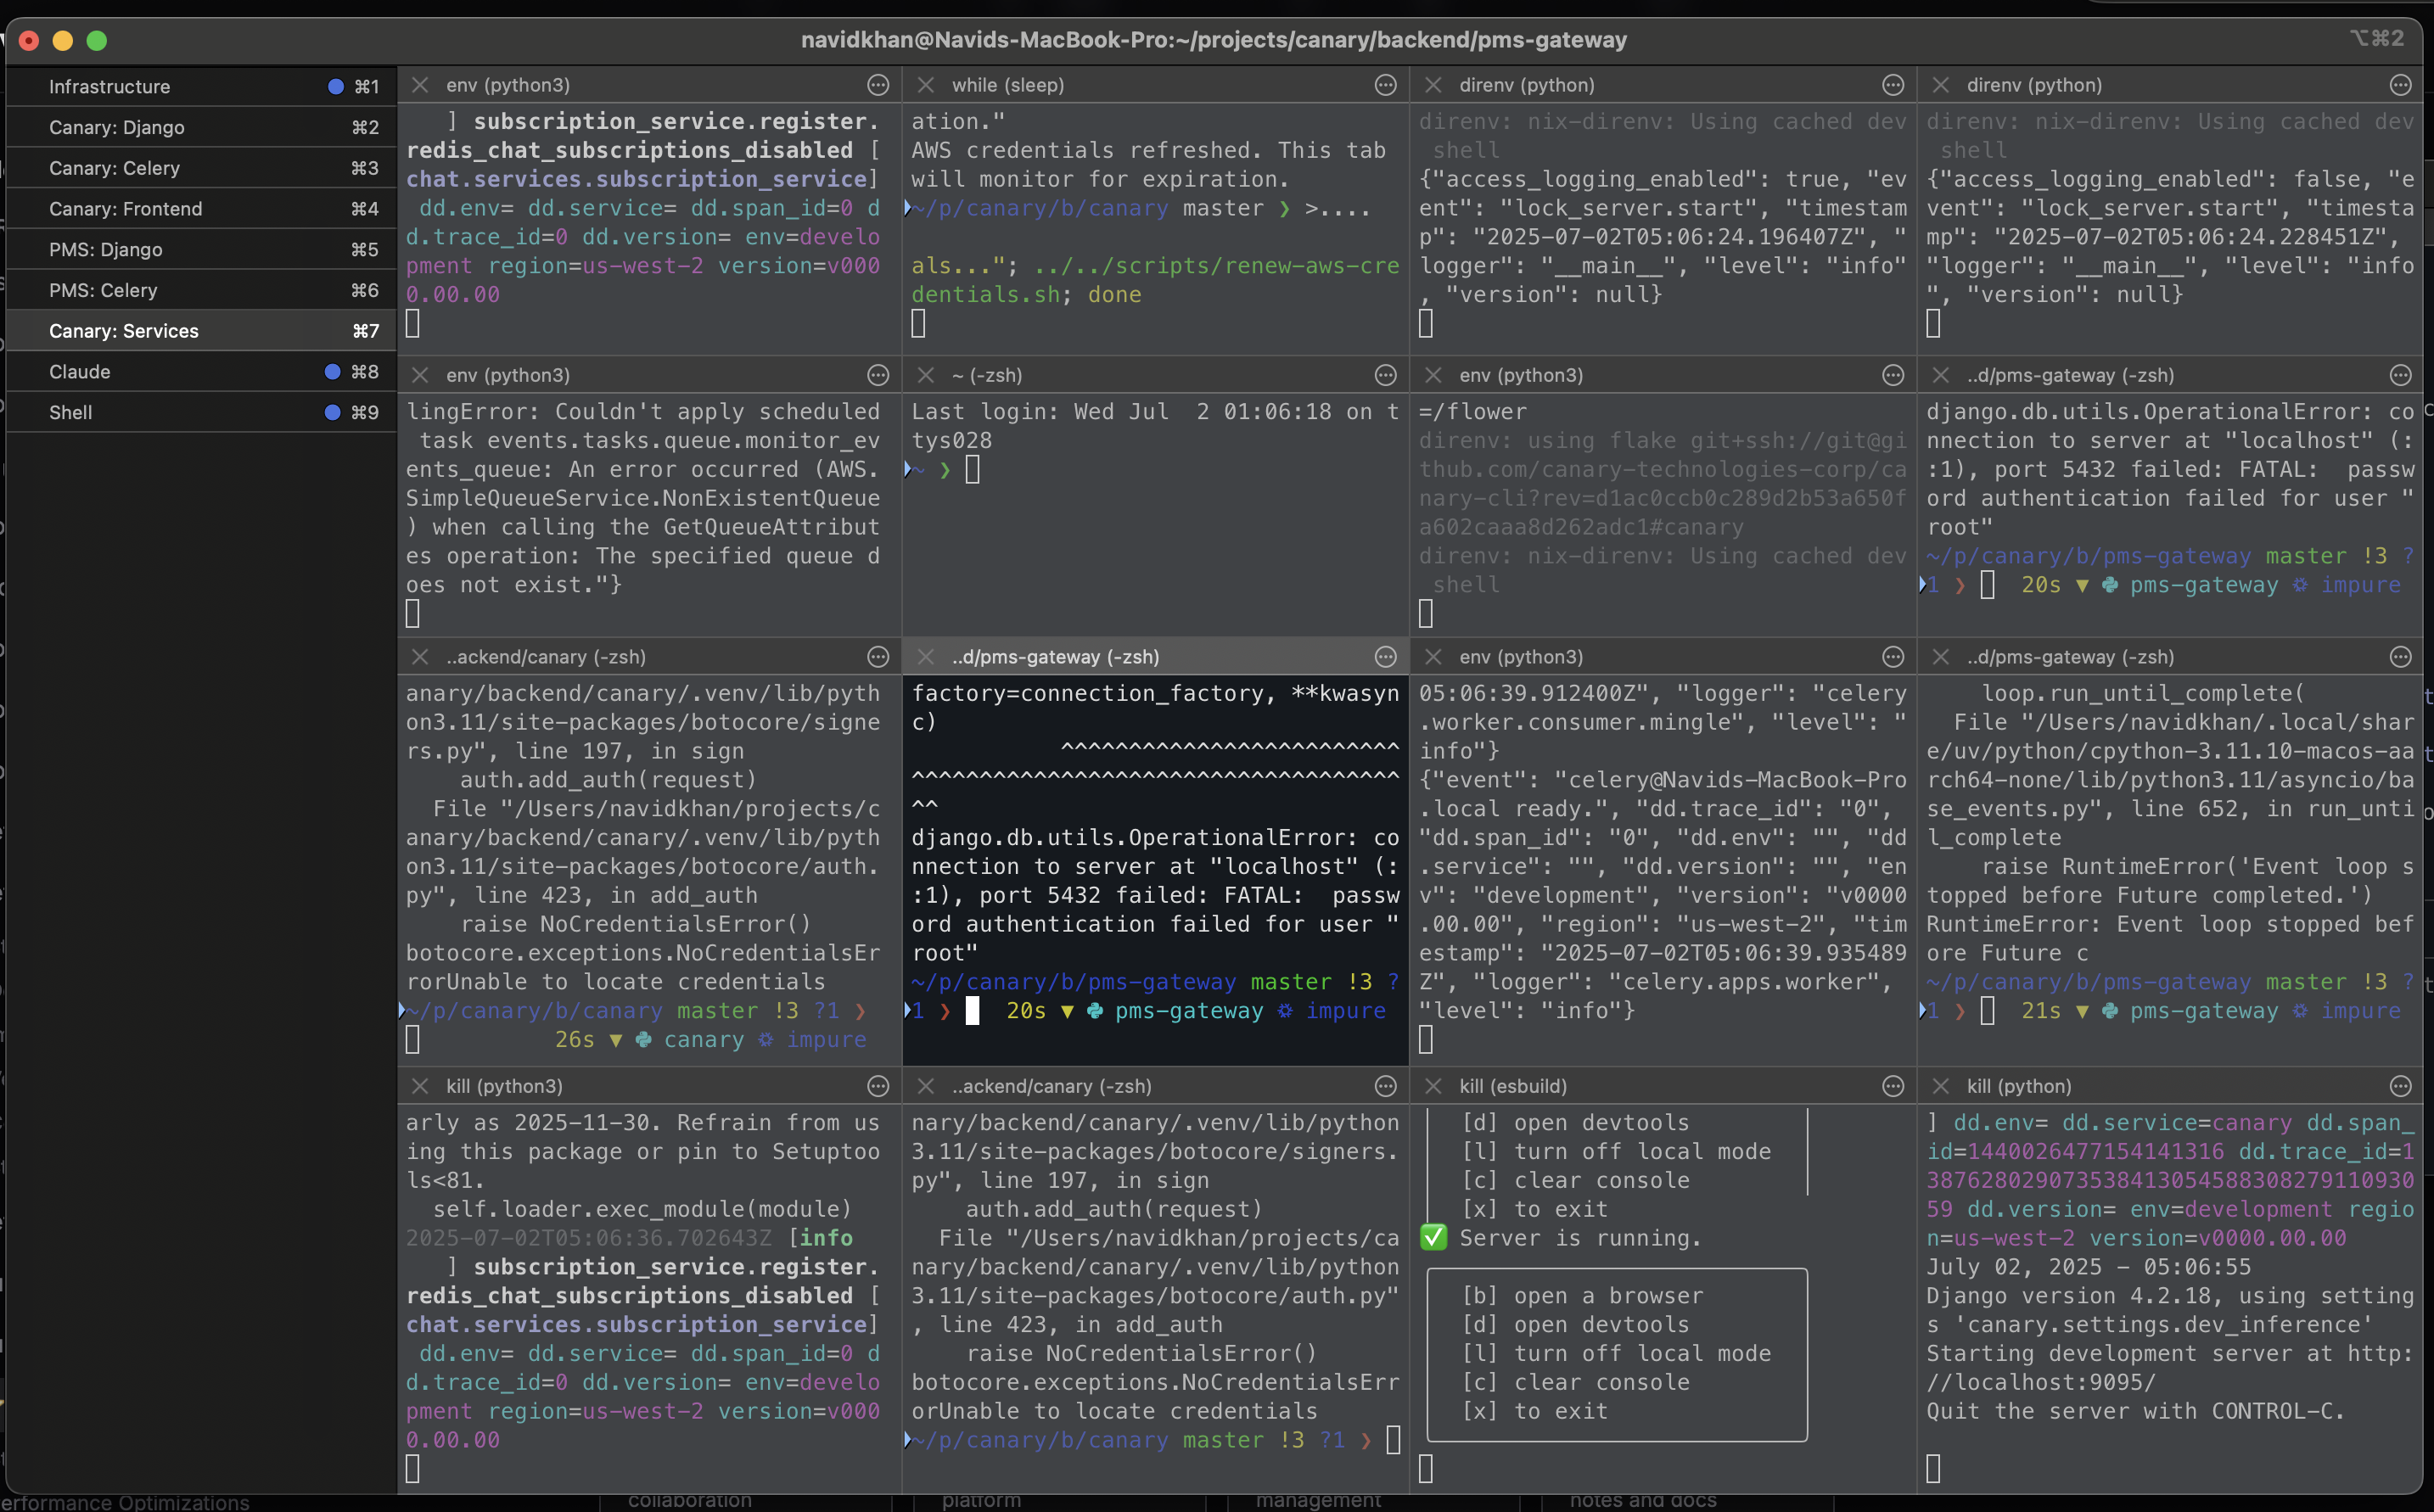
Congratulations! You've successfully set up your local development environment. Here's what your setup looks like in action:
Your iTerm2 Workspace
With all services running in organized tabs, you have complete visibility and control over every component:

Development Workflow
Everything is organized and easily accessible, making your development experience smooth and efficient:
Now you're all set to start building amazing features! 🚀
Set up macOS
Customize your macOS experience with recommended settings for productivity
Install Applications
Productivity and development applications for your Mac
Select packages to install:
Slack
Team communication and collaboration
Rippling
HR and IT management platform
Linear
Modern issue tracking and project management
Notion
All-in-one workspace for notes and docs
Notion Calendar
Calendar app that integrates with your workflow
Notion Mail
Email client from Notion
Obsidian
Powerful knowledge base and note-taking app
Raycast
Supercharged productivity launcher (Spotlight replacement)
Paste
Cloud-powered clipboard manager
Downloads from website
1Password
Password manager for teams and individuals
OrbStack
Fast, light, simple Docker & Linux machines
Postico
PostgreSQL client for Mac
PyCharm
Python IDE by JetBrains
VS Code
Lightweight code editor by Microsoft
Cloudflare WARP
Required for accessing company resources via Zero Trust
Proxyman
Modern HTTP debugging proxy
Warp
Modern terminal with AI features
Zoom
Video conferencing for team meetings
Loom
Quick video recordings for async communication
Windows App
Microsoft Remote Desktop client for accessing Windows machines
Figma
Collaborative interface design tool
Meticulous
AI-powered frontend testing recorder
Postman
API development and testing platform
Microsoft Teams
Team collaboration and video conferencing
Microsoft Excel
Spreadsheet application for data analysis
Configure Cloudflare Zero Trust
Set up Cloudflare WARP to access company resources securely
Open Cloudflare WARP application
open -a 'Cloudflare WARP'Connect to Canary Technologies Zero Trust
Connect to the company's secure network to access internal tools, staging environments, and other protected resources
Initial Setup
- 1.Click the Cloudflare WARP icon in your menu bar
- 2.Click the gear icon (⚙️) to open Preferences
- 3.Navigate to the 'Account' tab
Connect to Zero Trust
- 1.Click 'Login to Cloudflare Zero Trust'
- 2.Enter team name:
canarytechnologies - 3.Click 'Next'
Authenticate
- 1.You'll be redirected to your browser
- 2.Log in with your company Google account
- 3.Once authenticated, return to the WARP app
Verify Connection
- 1.Check the WARP icon in your menu bar
- 2.Verify it shows 'Zero Trust' with a green checkmark ✓
Configure 1Password
Set up 1Password for secure password management and disable Apple's built-in password autofill
Open 1Password application
open -a '1Password'Set up 1Password and Disable Apple Passwords
Configure 1Password as your primary password manager and disable Apple's built-in password autofill to avoid conflicts
- Sign in to 1Password with your company account
- Install the 1Password browser extensions for Chrome/Safari
- To disable Apple's password autofill:
- • Open System Settings → Passwords
- • Click 'Password Options' at the bottom
- • Turn OFF 'AutoFill Passwords and Passkeys'
- • Turn OFF all options under 'Use passwords and passkeys from:'
- In Safari specifically:
- • Open Safari → Settings → AutoFill
- • Uncheck 'User names and passwords'
- • This prevents Safari from offering to save or fill passwords
- Enable 1Password integration:
- • In 1Password, go to Settings → Browser
- • Enable 'Make 1Password the default password manager'
- • Enable 'Show autofill menu on field focus'
- For SSH key management (optional):
- • Go to 1Password Settings → Developer
- • Enable 'Use the SSH agent'
- • Follow the setup instructions to configure SSH keys
macOS System Preferences
Customize your macOS experience with recommended settings for productivity
Select settings to apply:
Clean & Auto-hide Dock
Remove all apps from dock (except Finder) and enable auto-hide for maximum screen space
Disable Siri & Apple Intelligence
Turn off Siri, remove from menu bar, and disable AI suggestions
Maximize Keyboard Speed
Set key repeat rate to fastest and initial delay to shortest for rapid typing
Maximize Mouse/Trackpad Speed
Set tracking speed to maximum for faster pointer movement
Enhanced Trackpad Gestures
Enable three-finger drag and two-finger right click
Desktop & Spaces Settings
Disable click wallpaper to reveal desktop and prevent automatic Space rearrangement
Remove All Focus Modes (except Do Not Disturb)
Delete all Focus modes except Do Not Disturb and remove Focus from menu bar
Hide Spotlight from Menu Bar
Remove the Spotlight search icon from the menu bar
Enable Safari Developer Menu
Show the Develop menu in Safari for web development tools
Fast Window Resize Animation
Make window resize animations nearly instant for snappier feel
Show Battery Percentage
Display battery percentage in the menu bar
Finder Developer Settings
Show hidden files, file extensions, and path bar in Finder
Screenshots to Desktop Folder
Save screenshots to a dedicated folder on Desktop instead of cluttering it
Create iCloud Drive Symlink
Create a convenient symlink to access iCloud Drive from your home directory
macOS Updates
Kick off the latest macOS updates to download in the background while you continue setup. Your Mac won't restart automatically—you're in control.
List all available software updates
softwareupdate --listInstall all available updates (downloads in background, manual restart required)
softwareupdate --install --allKiosk Development
Set up tools and configurations for iPad kiosk development
Set up MDM on your iPad
Configure Mobile Device Management for kiosk development and testing
iPad MDM Configuration
- TODO: Add MDM setup steps here
MDM (Mobile Device Management) is required for kiosk mode development and testing.
Load Kiosk Test Data
Load fixture data to enable end-to-end testing with Opera and OHIP labs
Load kiosk fixtures for Canary backend
cd ~/projects/canary/backend/canary && python manage.py load_kiosk_fixturesLoad kiosk fixtures for PMS Gateway
cd ~/projects/canary/backend/pms-gateway && python manage.py load_kiosk_fixturesAbout Kiosk Fixtures
These fixtures create test data that enables a fully functional kiosk environment
- The fixtures include test data for Opera PMS integration
- OHIP (Ontario Health Insurance Plan) lab connections are configured
- Test patient records and appointments are created
- Kiosk check-in workflows become fully operational
After loading fixtures, you'll have a complete end-to-end environment that can communicate with our Opera and OHIP test labs, allowing you to use the kiosk functionality!
PMS Mock Server
Set up and configure the PMS Mock Server for local development
PMS Mock Server Setup
Configure the mock server for PMS integrations
Coming soon...
Talking to the Cloud
Connect to and manage cloud infrastructure
Cloud Infrastructure Access
Tools and commands for interacting with Kubernetes clusters and cloud services
Prerequisites
Before accessing cloud resources, you MUST have already run:
canary aws local-access-setupThis command sets up your AWS profiles and credentials. Without this setup, the kubeconfig generation will fail.
💡 If you haven't run this command yet, go back to the 'Set up AWS Access' section and complete it first!
Migration in Progress
These docs provide instructions for Kubernetes (K8s), which we are currently migrating to. Production currently runs on ECS.
To get shell access to ECS containers, use the Canary CLI:
canary shell-plus --helpThis command provides information on how to access shells in the current ECS-based production environment.
Generate kubeconfig for all Canary Kubernetes clusters
cd ~/projects/canary && cat > setup-kubeconfig.sh << 'EOF'
#!/bin/zsh

gen_kubeconfig() {
  # Generate kubeconfig with the given parameters
  local account=$1
  local region=$2
  local profile=$3

  AWS_PROFILE=$profile aws eks update-kubeconfig --alias $account-main-$region --name main-$region --region $region
}

for region in eu-central-1 us-west-2 ap-southeast-1; do
  for env in stg prd; do
    case $env in
      "stg")
        if [[ $region == "us-west-2" ]]; then
          gen_kubeconfig $env $region canary-$env-shell-plus-readwrite
        fi
        ;;
      "prd")
        gen_kubeconfig $env $region canary-$env-shell-plus-readwrite
        ;;
    esac
  done
done
EOF
chmod +x setup-kubeconfig.sh && ./setup-kubeconfig.sh
Launch k9s to manage Kubernetes clusters interactively
k9s